Introduction
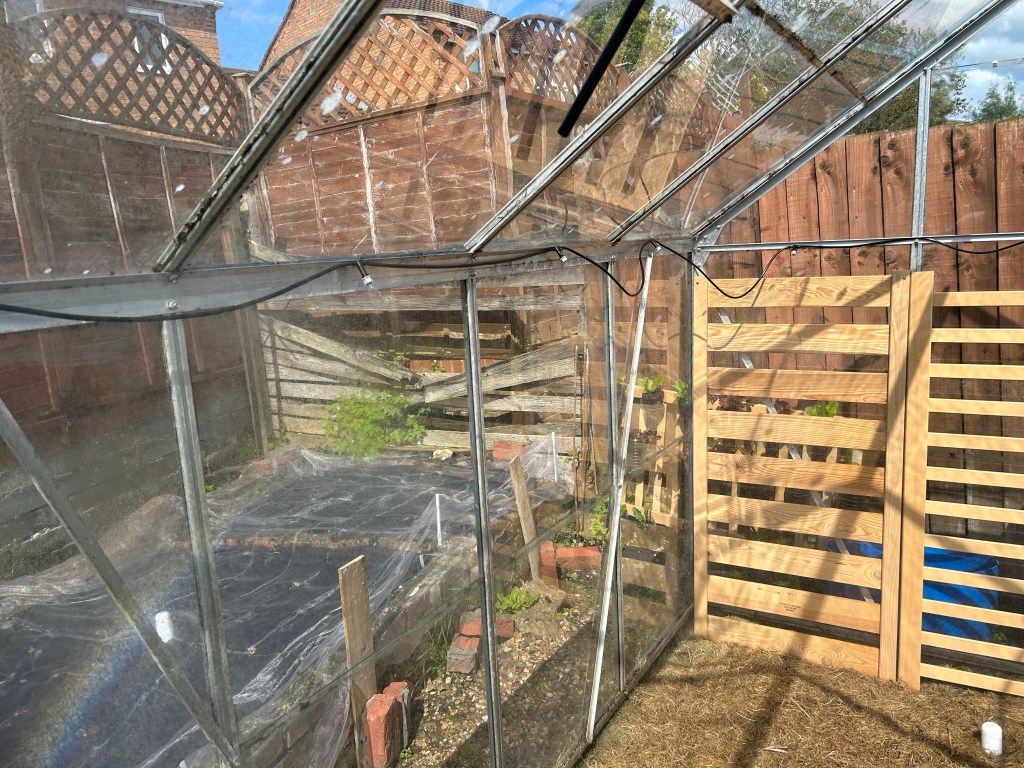
One of the nicest things to have in the garden, especially for an aspiring big-time gardener like myself, is a greenhouse. When our newly purchased home came with an 8 x 6 feet glass and aluminium constructed greenhouse, complete with an electrical socket, I couldn’t contain my excitement. Despite its neglected state, with dry soil and dirty glass, it was still a greenhouse, and that alone made me love the house the more.
As summer rapidly approached, the need to water my plants became more involved. I wanted a way to automate the watering process, and this desire led me to embark on building a DIY irrigation system. The first decision I had to make was choosing between a sprinkler and a misting system. After careful consideration, I opted for a misting system.
Not only did I want to regulate soil moisture, but I also wanted to control the overall humidity inside the greenhouse; for I wanted to experiment with growing some plants that do not readily grow in the UK. Additionally, misting provides a wonderful cooling effect during scorching hot days, far superior to mere sprinkling. In this blog post, I will show how I designed and built it step by step.

Disclosure:
Before we begin, please note that this blog post contains affiliate links. If you make a purchase through these links, I may earn a commission at no additional cost to you. These commissions help support the maintenance of this blog and the creation of valuable content. Thank you for your support, now let’s get into it.
Planning and Research
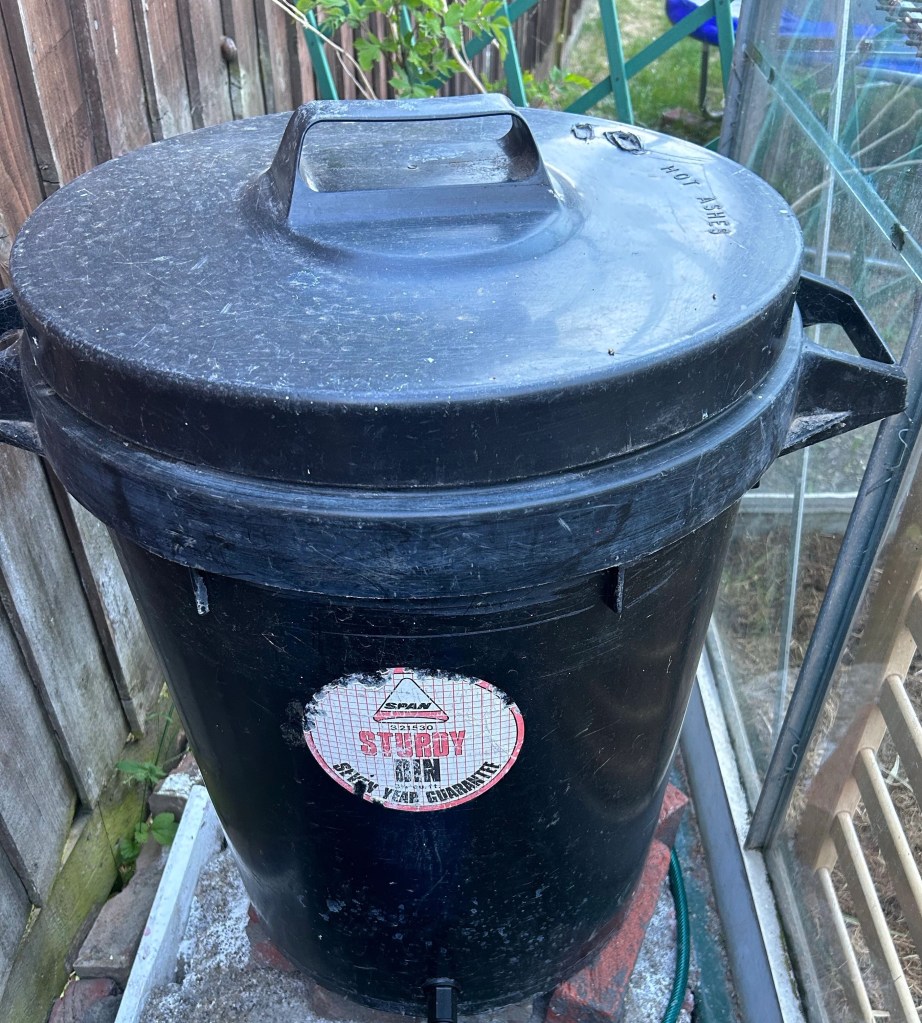
Before diving into any DIY project, it’s important to plan and conduct thorough research. In my case, one of the challenges I faced was the distance between the external tap and my greenhouse. To overcome this, I needed a water reservoir. Luckily, the previous owners had left behind an ashes bin, which turned out to be the perfect solution. It was tough, thick, black and came with a lid to cover it up well.
Gathering the Materials
To create a misting system that works, I gathered several essential materials. Here’s a list of the items I purchased, including their links to where they can be purchased on Amazon and eBay:
- Misting Nozzles
- High-Pressure Pump
- 10mm Inner Diameter Tube
- 12mm Inner Diameter Hose (Garden Standard)
- 10mm to 12mm Hose Connector
- 4mm to 10mm Hose Connector
- Water Reservoir (repurposed Ashes Bin), if wanting to buy a water butt, here is one
- Pressure Pump Power Supply
- Water Butt Tap
- Female Hosepipe connector
In some instances, one might be able to find a complete package that can be purchased that comes with the pump, nozzles and connectors. Outside the fact these options are most times more expensive than getting them individually, for this use case they don’t come with the level of flexibility I wanted; for example, where my pump was situated in the greenhouse, and linking it to the nozzles. Also the tap I used was specifically chosen, so I can easily unplug the pump’s hose to fetch water into my watering can if I need to with ease.
Water Reservoir Setup
To ensure a steady water supply, I repurposed an ashes bin left behind by the previous owners (which I have no use for) as a water reservoir. Positioning the reservoir near the greenhouse served a dual purpose. Not only did it provide easy access to water for the misting system, but it will also allowed me to collect rainwater. This was a fantastic alternative to using chlorinated tap water, as rainwater is naturally free of chemicals and better suited for watering the greenhouse.
Calculations and Testing
To ensure the pump had the right pressure and litres/minutes to support my system, it was crucial to calculate the required PSI (pounds per square inch) for the high-pressure pump. Based on the number of misting nozzles and the inner diameter of the connecting pipes, the following formula was used:
PSI = (Flow Rate per Nozzle × Number of Nozzles) / (Cross-Sectional Area of Connecting Pipe)
Generally misting nozzles have an average flow rate of 1 gallon per minute (GPM) and I had 12 nozzles, and the connecting pipe has a 4mm inner diameter, I then calculated the required PSI as follows:
PSI = (1 GPM × 12) / (π × (4mm/2)^2)
So in my specific case, with 12 nozzles spaced by 2 feet of 4mm pipe, the minimum needed PSI for effective misting would vary. However, as a general guideline, a minimum PSI of 30-40 is recommended for misting systems. This ensures that the water is properly atomized and distributed evenly across the greenhouse. Regular testing and adjustments are essential to fine-tune the system and achieve the desired misting effect.
Assembly and Installation
Now, let’s move on to the assembly and installation process:
- Installing the misting nozzles: I positioned the misting nozzles along the designated area in my greenhouse, ensuring they were evenly spaced. Then sealed the end of the last nozzle chain to prevent any water leakage.
- Attaching the water butt tap: I drilled a hole at the bottom of the ashes bin, and securely attached the water butt tap. This allowed to control the water flow from the reservoir to the pump, and fetch water directly when needed.
- Connecting the hoses: I attached a female garden hose connector to the standard 12mm garden hose, and connected it to the water butt tap. Cut out two 1 meter length tubes from the 10mm tube pipe. Used the 10mm to 12mm hose connector to attach one of the 10mm tube to the 12mm garden hose. Then, using the 4mm to 10mm hose connector, attach the other 10mm tube to the 4mm pipe of the misting nozzles.
- Connecting the tubes to the pump: Next connected the 10mm tube linked to the garden hose to the water inlet of the high-pressure pump. Then finally connected the other 10mm tube to the outlet of the pump.
Conclusion
I hope by following this step-by-step guide, you are inspired to successfully build your own DIY misting system for your greenhouse. From purchasing the necessary materials to assembling and then testing the system. Via this, you can create a refreshing environment that will support the growth and well-being of your plants. Control of the system is as simple as controlling the power to the pressure pump, thanks to the electrical power already installed in the greenhouse.
However, that’s not all! In an upcoming blog post, I will show you how I automated the control of the power to the pump. This exciting addition will allow the system to come on at specified times, and I even integrated a local push button in the greenhouse for manual control. As part of my wider home automation setup, I can also control the misting system via Telegram chats using Natural Language Processing (NLP), making it even more convenient and versatile.
Stay tuned for the another blog post, where I’ll share the details of automating the misting system control. Get ready to take your greenhouse experience to the next level!

One response to “How I Built my DIY Misting System for my Greenhouse”
[…] is blog post, I wrote about how I built my misting system for my greenhouse. The efficacy of my misting system […]
LikeLike